 (english below)

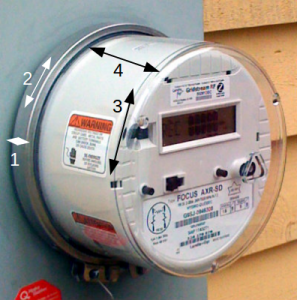 Dimensions du Compteur polluant:
- circumphérence de la bague= 565mm; diamètre de la bague= 180mm
- largeur de la bague: 20mm
- circumférence du boîtier= 510mm; diamètre du boîtier= 162mm
- profondeur du boîtier= 90mm
Achetez (1) un rouleau de mousticaire en aluminium et (2) un rouleau d’isolant avec une couche en aluminium, (3) un fil électrique AWG 16 ou 18 et (4) deux aimants néodyne (5) fil à coudre non dégradable et non déchirable (ou agraffes avec agraffeuse).

Le Manuel de la Fabrication du CoCo-i:
Coupez un rond dans du carton avec un diamètre de 8 ». Utilisez le rond en carton comme guide pour couper un même rond dand du isolant réfléchissant. Ensuite couper une languette de 25 » de long et 8.5 » de haut. J’ai utilisé cet isolant: Isolant réfléchissant A2A, 16 »x25′) .


Placez le rond sur la languette et aggraffez les deux ensemble. Ainsi vous formez la boîte du Coco-i.

Maintenant vous allez couper un autre rond en carton d’un diamètre de 15.5′. Utilisez-le comme guide pour couper un rond dans du moustiquaire en aluminium sans peinture; cela vous fait la cage faraday.

Prenez votre rond en aluminium et moulez-le par dessus votre compteur polluant afin qu’il prenne la même forme.

Ensuite vous inserrez la ‘corbeil’ en aluminium dans le contenant en isolant que vous avez fait avant. Pliez le rebord de l’isolant vers l’intérieur du CoCo-i afin qu’il va par dessus le moustiquaire. Aggraffez le rebord plié.

Prennez un clou pour percer un trou à travers l’isolant et le moustiquaire pour passer un rivet ou une visse qui fixe un connecteur rond au bout d’un fil électrique (1xAWG18). L’autre bout du fil va être équipé d’une prise banane, bague vissé selon la façon de la quelle vous allez connecter le CoCo-i à la mise à terre.
Maintentant votre CoCo-i est prêt à être installé:
Simplement glissez le sur le compteur polluant. Tournez le sceau du compteur pour l’inserrer sous le CoCo-i pour et poussez le dernier au fond; les aimants vont se coller au boîtier en métal qui abrite le compteur.

Vous avez 3 possibilités de connecter votre CoCo-i à la mise à la terre: en utilisant une prise banane qui va dans le trou rond d’une prise électrique. Ou par une bague qui fixe le fil à un piquet mise à la terre. Ou bien en fixant le fil par une vis au boîtier métallique qui tient le compteur. (souvent les coins ont déjça des petits trous).

Manual of installation of the CoCo-i
- Cut out a cardboard round of 8 » diameter. Place it on the aluminum coated bubble foil (hardware store insulation; i bought this one: Isolant réfléchissant A2A, 16 »x25′) and cut out 1 round and one strip of 25 » lenght and 8.5 » height.


- Place the round on the flat strip to tack them together with staples

Cut out a cardboard round of 15.5 » diameter to use as a guide to cut a round into the aluminum, non-painted moskito screen, that you will use as a faraday cage.

Take your 15.5 » round cut out of aluminum screen and go to your polluting meter. Use your meter as a guide to shape the moskito screen around it.

Then insert your faraday cage into the bubble foil housing that you did before. Fold the rim of the bubble foil housing to the inside so it covers the faraday cage. Staple it in place.

Take a nail and pierce a hole into the wall of the housing through the faraday cage. Use a rivet or a screw to fix the cable (1xAWG18) with the round head terminal to the Coco-i. Fix a banana plug to the other end if you want to ground the Coco-i into a wall plug. Or fix the other end to a screw-clamp if you want to fix the Coco-i to a ground pole. You can also ground the Coco-i by screwing the other end of the wire to the metal box which houses the meter.

Cut a 1 » strip of duct tape, stick it to the inside of the Coco-i and staple it in place. Put a neodyn magnet (round, 10mmx3mm) on the duct tape. Cut a piece of aluminum tape and stick it to the duct tape (glue side onto glue side) to hold the magnet in place. Install another magnet on the opposite side.

Now your Coco-i is ready for installation:
Just glide the Coco-i over the meter. Turn and push the seal into the Coco-i and slide to the end; the magnets will attach on to the metal box of the meter.

You have 3 choices to connect your CoCo-i to the ground: by using the banana plug and connect it to the round inlet of a wll plug. Or by using the screw-clamp and attach the Coco-i to a ground rod. Or to simply use a wood screw and fix the wire to a small opening of the metal box that holds the electrical meter.
