 Description
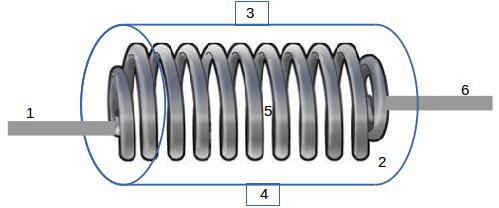
Une spirale en cuivre mou, 1/4 » diamètre intérieur, nano-plauqée seulement à l’extérieur qui est inserrée dans un tuyau d’un plus grand diamètre qui contient de l’Eau-de-GaNS-CO2.
L’eau est vivifié en coulant à l’intérieur du tuyau de 1/4 », qui est nano-plaqué à l’extérieur et qui transmet l’énergie plasmique qui l’entourne. L’eau de GaNS utilisé peut varier enter CO2 pour des alimentations d’eau pas trop chargée ou CuO pour des alimentation où l’eau est plus polluée. Le diamètre de 1/4 » permet ce vivifacateur seulement pour l’eau potable (installation sous l’évier, voir le 2e image)

Fabrication
- Chauffez le tuyau en cuivre mou pour le rende plus maléable
- Remplissez-le avec du sable
- Pliez-le graduellement autour d’autre tuyau de diamètre de plus en plus petit jusque vous arrivez à plier votre tuyau autour d’un diamètre de 2 »
- Videz le sable
- Nano-plaquez le tuyau au feu une fois
- Laissez refroidir et bouchez les ouvertures pour que la solution caustique n’y rentre pas
- Creusez 2 filets de 1/2 » dans le grand tuyau au mileu; un vis-à-vis de l’autre (3, 4). Par ces trous vous chargez ou changez le système avec l’Eau-de-GaNS.
- Bouchez le filets avec deux caps vissés de !/2 »
- Cappez le grand tuyau en plastique d’un bout.
- Creusez un filet de 1/2 » à l’endroit du cap où va sortir le tuyau de 1/4 »; installez un adapteur (1/2 »mnpt x 1/2 »hose)
- Inserrez le tuyau de 1/4 »
- Installez le connecteur (union vissé) au bout du tuyau de 1/4 »
- Étanchez le tuyau de 1/4 » avec du silicone dans l’adapteur
- Creusez un filet de 1/2 » à l’endroit de l’autre cap où va sortir le tuyau de 1/4 »; installez un adapteur (1/2 »mnpt x 1/2 »hose)
- Collez le cap et étanchez le tuyau de 1/4 » avec du silicone dans l’adapteur
- Installez le connecteur (union vissé) au bout du tuyau de 1/4 »
- Étanchez le tuyau de 1/4 » avec du silicone dans l’adapteur
- Connectez le système à l’arrivé d’eau et au petit robinet
 Unité alkalisante
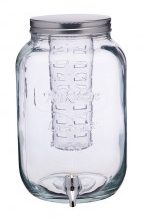
proposé par M.Keshe
Une caraffe avec un cylindre au mileu qui contient probablement PL-CO2+CuO. Toutes les parties de la caraffe sont en verre cristal pour mieux conduire le plasma. L’eau dans la carafe devient alkalin (ph>8).
Le prix? 150€
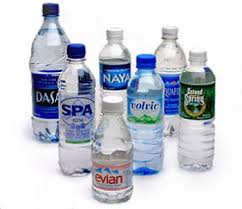
Plasma Charge up 16-oz water bottles
 By
By -
Use a plastic container with walls at least 9″ tall. The bigger the container, the more bottles one can charge up at a time.
-
Put 16-oz (500ml) plastic water bottles into the container and stand them upright, with bottle caps on and unopened. (If one want to use one’s own water, just reuse empty bottles, fill them up and recap.)
-
Fill up the container with as much of the clear charged water sitting above the CO2 and/or ZnO GaNS as possible.
-
If needed fill up the rest of the container with regular water to a level just below the bottle caps, so about 3/8″ of the slanted neck of the bottle is still above the water.
-
Connect the air hose to the check valve that comes with the air pump and connect to the air pump, and plug in the air pump. Position the air hose end under the water in the contain so the air bubbles rise up and bubble around the bottle necks. One may have to use an aquarium « bubble wall » with a large container.
-
Let any new waters mixed with the GaNS charged water charge up at least 24 hours. Then keep all the bottles in the water at least another 24 hours to charge fully before drinking. After the container water is charged up, after 24 hours, it will then only take 24 hours of sitting in the bubbling water to charge up bottles for drinking each time you put in new bottles for charging. NOTE: If the container is so large with lots of bottles that the air bubbles won’t bubble up around and touch some of the bottle necks, use a T-tee on the air hose to put in multiple air hoses or use multiple aquarium « bubble walls » so all the bottles have air bubbles bursting onto the exposed necks of each bottle.
-
Add local purified water or the clear charged water above the CO2 and/or ZnO GaNS AS NEEDED to keep the container water level up so that the bottle necks are exposed 3/8″ below the bottle cap, so the air bubbles touch and burst on the exposed bottle necks.
Water is made of both hydrogen and oxygen so the moving oxygen acts like a energy flow current to transfer the plasma field into the bottles at the bottle necks. When the water is not circulating it is like the current is turned « off, » so circulate the water using air bubbles. Be aware of what items are around the charging container because the plasma fields will « pick up » on the energy and imprint the water. Try to use a quiet room with no electronics or metals.
On the other hand, one can imprint the water with one’s intention, crystals, stones and even things like vitamins. Be creative, love. peace
Vitaliseur d’eau
Pour puits
Préparer le mélange de PL-60%CuO+20%CO2+20%ZnO+10%CH3. Remplir une bouteille avec ce mélange tel quel; remplir une autre bouteille d’un volume égal avec 30% du mélange dilué à 70% d’eau distillée.
Simplement suspendre les 2 bouteilles dans le puits. Elles créeront un champ plasmique dynamique qui élimine les contaminants.
Pour l’entrée d’eau
Simplement fixer deux bouteilles autour du tuyau d’entrée d’eau selon le même principe que le puits.