May this article help you to manufacture, assemble and connect Magrav coils.
Pray with your soul for Peace before you start manufacturing.
Table of Contents
Understanding coil making
To make Magrav coils we use AWG14 copper wire (1.6mm Ø). AWG14/3 copper wire is available at Canadian Tire for $60.00 per 50m. You can find the rods around which you will wind the copper wires at Canadian Tire (∅3/16” for $2.99 and ∅3/8” for $6.29).
Do not use yellow copper wire, which is harder. Use only single strand copper wire; braided copper stranded copper wires are not usable, as it will create an imbalance in the Magrav fields and it will not be able to generate its forces.
The names of the coils
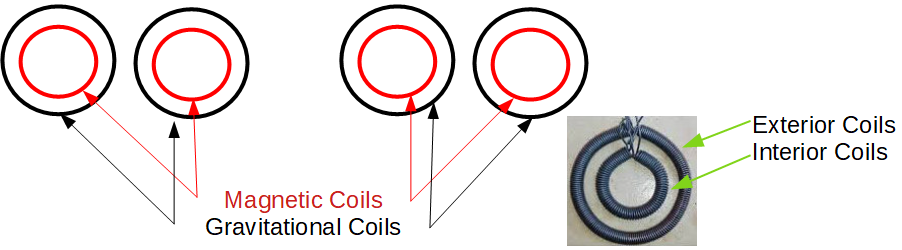
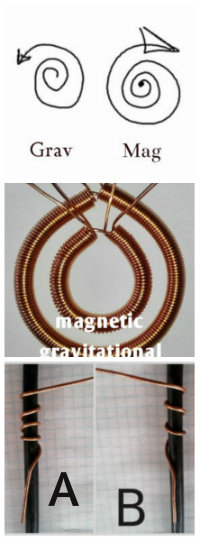
Each stack of a Magrav consists of 2 double coils: an outer and an inner reel. Each double coil consists of a gravitational coil that is on the outside and a magnetic coil on the inside.
Calculate the lengths of copper wires
You will manufacture 12 coils:
– 3x external magnetic coils
– 3x inner magnetic coils
– 3x external gravitational coils
– 3x internal gravitational coils
Use the following formula to calculate the length of copper wire you need:
Gross wire length = ((Dg+Df)*pi*N)+E
Coil length=0.065*N
Dg = diameter of the rod around which you are winding
Df = wire diameter
N= number of turns
E= extra for straight ends
The straight extensions are used to make the connections: 40mm for the outer coils and 1.5x the length of the coil for the inner coils.
measurements in mm/m
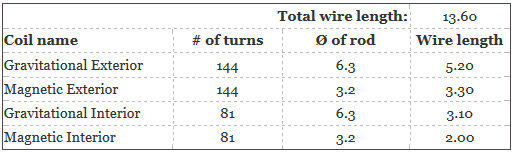
 Direction of winding the coils
The winding direction determines whether the coil is
- gravitational
it is turned anti-clockwise; it absorbs - magnetic
it is turned clockwise and gives
The gravitational coils are outside because we want to absorb the energy of the ambient Plasma. The magnetic coils are inside because they transmit the energy to the copper wire, which is in a material state to be able to use it as electrical energy.
- Magnetic coils are made by turning the wire clockwise around the rod
- Gravitational coils are made by turning the wire anti-clockwise around the rod
To space the windings of the coil, use a butter knife and insert it between each turn along the length of your coil while it is still on the rod.
Coil making
Outer gravitational coils (3 pieces)
- Cut an AWG14 (1.6mm) copper wire to a length of 5.80m. Strip it.
- Turn the copper wire around a 3/8” (9.50mm) rod clockwise for 144 turns.
Outer magnetic coils (3 pieces)
- Cut an AWG14 (1.6mm) copper wire to a length of 3.33m. Strip it.
- Turn the copper wire around a 3/16” (4.80mm) rod counter-clockwise for 144 turns.
Inner gravitational coils (3 pieces)
- Cut an AWG14 (1.6mm) copper wire to a length of 4.00m. Strip it.
- Turn the copper wire around a 3/8” (9.50mm) rod clockwise for 81 turns.
Inner magnetic coils (3 pieces)
- Cut an AWG14 (1.6mm) copper wire to a length of 2.13m. Strip it.
- Turn the copper wire around a 3/16” (4.80mm) rod counter-clockwise for 81 turns.
In this video, you can see how to wind coils with a drill. Made in this way, the coil will be very tight; you can create a small space between each winding by pulling both ends of the coil at the same time in opposite directions.
Assembly of the coils
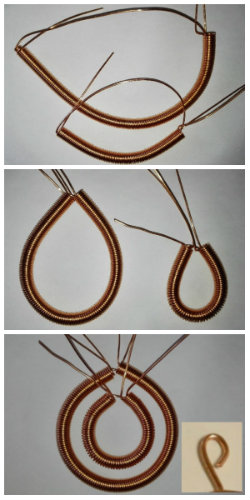 A Magrav is composed of 3 stages of double coils: the gravitational double coils surround the magnetic double coils.
- Insert the inner coil into the outer coil; both have the same winding direction.
- Take the extension of the inner coil and insert it into the other end of the same coil.
- Push the extension out of the other end of the coil. The two ends will get closer. Bend the extension to keep it in place.
- Fold the two coils to form circles and place the magnetic coil inside the gravitational coil.
- Bend all the wire ends on themselves so that they form “b”s. In this way, the energy in the wire will not escape, but will be redirected upon itself.
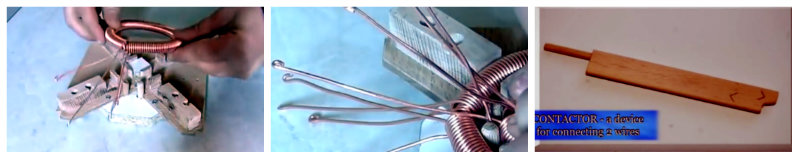
Connect the coils
It is preferable to make all connections before nano plating to protect the nano layers from manipulation.
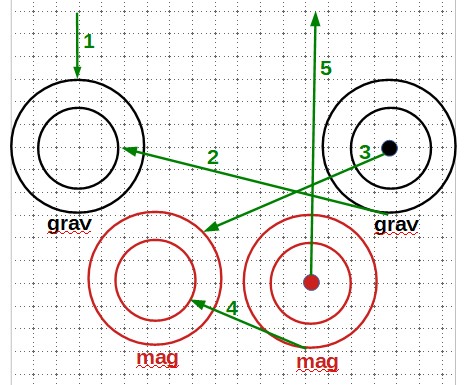 The diagram on the right shows you how to make the connections between the coil terminals:
- The phase (+) enters through the terminal of the outer gravitational coil.
- The other terminal of the outer gravitational coil is connected to the inner gravitational coil.
- The extension of the inner gravitational coil is linked to the outer magnetic coil.
- The other terminal of the outer magnetic coil is connected to the inner magnetic coil.
- The extension of the inner magnetic coil is the output of the stack.
The ends of the wires are folded over themselves. Then the giving terminal is surrounded by the receiving terminal.
 Welding is not possible, as nano-particles do not allow it. Screwing them together does not work either, because by tightening the screw, you will destroy the nano layer.
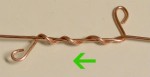
Armen invented removable connectors, nicknamed pigtail: he twists 9 turns around a straight wire to connect. Then the two ends to be joined are inserted on both ends of the pig’s tail. These connections are flexible and you can disconnect and reconnect easily.
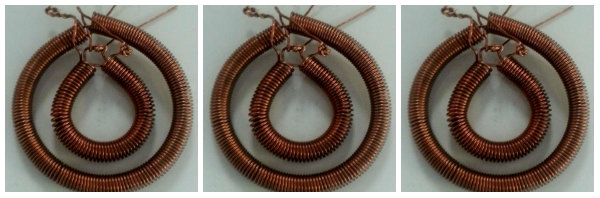
You now have 3 sets of 2 double coils.
GaNS-coating the coils
KSW279: for energy applications we better use the H, H2, H3 GaNS to cover the Magrav coils for example.
Pour les unités MaGrav, M. Keshe a recommandé de ne pas tremper les bobines dans du GaNS parce que la performance d’absorption de champ du carbone dans les couches-nano est dégradée par celui-ci.
Always add your amino acids to the GaNS that is applied to the coils.
Apply to the exterior coils LP+ GaNS-CH3; and to the interior coils LP+GaNS (CuO, CO2, ZnO).
 It is preferable to dry the GaNS and mix it with distilled water afterwards. The mixture should not be thick so that it does not fill the spaces between the coils of the coil and you end up with a tube and not a coil.
Hang the coils up to dry. Never touch them as this can damage the nano layers.
The coils are ready once completely dried; it is really important to dry them completely because even the slightest humidity can produce sparks (short out) when you connect your magrav later.
Be careful never to touch or place the coils on top of each other – a nano plated surface is like a sponge, the slightest pressure damages it!
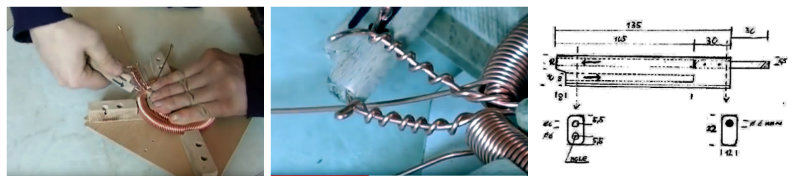
Winding tool
By Society Blue Planet on youtube
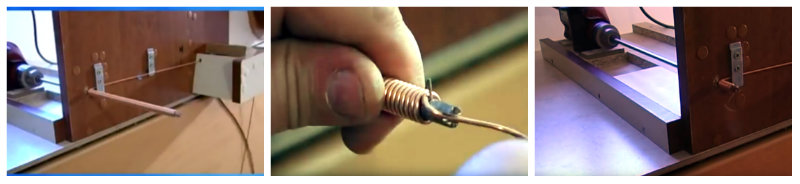
The machine is made of a slide on which the drill is mounted (a piece of wood that slides between two other fixed wooden strips. There are two slides for the two diameters of the rods.
The rods have a slot in front to wedge the copper wire and a 0.9mmØ perpendicular pin to separate the turns of the coil at the end.
Count the turns for the first reel and make a mark for the 144 laps and another for the 81 laps. After that you can use the marks and don’t need to count anymore.
Tool for making connections
By Society Blue Planet on youtube